PSA*: Zebra Print Binder
Why? Because I get a lot of blog hits for "zebra print 3 ring binder" and the thought of those hundreds (okay, tens) of people coming to my blog most likely in an attempt to buy that very thing and having to leave bitterly disappointed is just too much for my soft, animal-print-loving heart to bear.
And I am nothing if not giving.
So without further ado, I give to you:
How to Make Your Own Zebra Print 3 Ring Binder
Materials:
1. Clear View Binder (Staples has various sizes and prices depending on your specifications.)
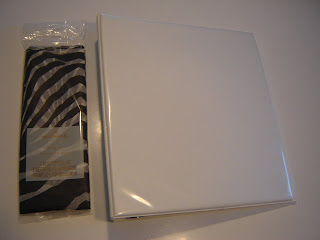
2. Zebra print paper (I recommend thick wrapping paper on a roll, or tissue paper – Hallmark: < $2.)
3. Sheets of thick white paper (This is particularly important if you are using tissue paper as I did.)
4. Iron (Skip this at your own peril and possible sanity.)
5. Ruler (Or eyeballs if you’re particularly good at eyeballing measurements or aren’t afraid you’re going to run out of tissue paper due to over-confidence in your eyeballing abilities. In fact, I recommend using your eyeballs at all times even if you have a ruler. It’s just plain safer.)
6. Paper Cutter (Or not, if you’re good with scissors, which I am not.)
7. Tape
Procedures:
Iron the paper on the lowest setting of your iron. Do not leave the iron on the paper, but move it quickly over the surface until the paper is smooth. Touch it. It should be smooth and warm. This step is not important in the manufacturing of your binder, but it feels nice, so go ahead. No one is looking.
Measure, or eyeball the size of the zebra print paper to match the dimensions of the space available in the binder’s clear front cover (repeat with back cover and spine). Cut zebra and thick paper to the correct dimensions, making the zebra paper slightly (about 1/4˝) longer.
Center the zebra paper over the thick paper, wrapping the slight edges over and tape to the thick paper.
Slide the inserts into the spaces on the binder. The spine is tricky. I recommend gently rocking the paper side to side while applying a slight downward motion. Do NOT allow the paper to bend – you may have to start over. There’s nothing worse than a flaccid spine insert. Keep it crisp and you too can have your very own Zebra Print 3 Ring Binder. 
Cool beans!
Thanks for stopping by!
* I needed to change the title if I really wanted it to be a public service. Again, all about the giving.

Comments